From an old Lenovo Forum:
"When you select "maximize battery lifespan," the software changes what the system sees as maximum battery capacity. In one of your screenshots, you can see that it says the remaining charge is higher than the full charge capacity. So right now, your battery is 100% charged (94 Whr). The next time you use the system on battery and then plug it in again, it will only charge up to 87 Whr. As long as you have maximum lifespan mode on, the identified full charge capacity will always be less than the battery's actual full charge capacity. Windows and Power Manager will recognize that as 100% charged, even though it's actually 92% charged. And as a result, the battery will get less wear because it's not sitting at full charge.
On my year-old W530, the actual full battery capacity is now 87 Whr, and maximum lifespan mode reduces that to 77 Whr (88% of actual charge capacity). 77 Whr will show up as 100% charged unless I switch the battery mode to maximum runtime, at which point the capacity switches back to reading as 87 Whr."
So the "Maximize battery lifespan" aka "Maximize battery health" is deceiving. It doesn't mean make your battery charge last the longest.
The problem is to figure out where that setting is located. I looked on my desktop and I couldn't find it. Hah. It's a desktop. But that says something about where to find it. It is probably in a special power manager utility that comes with your laptop. I looked on my Lenovo and remembered that the Lenovo utilities were such a hassle that I had blown them away. So I downloaded a bunch a files to get to the point where I could download the Thinkvantage Power Management Driver, where I suspected the undesirable setting lived. Once the driver was downloaded and installed, this is what I did:
- Open Control Panel (https://www.lifewire.com/how-to-open-control-panel-2625782 https://www.lifewire.com/how-to-open-control-panel-2625782
- Left click and open Power Options, one of the selections in the Control Panel.

- You will see one of the radio buttons under "Choose or customize a power plan" is selected (button is black). Click on the "Change plan settings" link to the right of that button.

- Click on the "Change advanced settings" at the bottom of the window.

- The resulting window has two tabs. (By the way, before I installed the Lenovo Power Management driver, there was only one tab.) Select the "Lenovo Energy Management Tab".

Another version of the Lenovo Power Manager does not show a separate tab on power options. Instead, you have to search for the program in the Lenovo folder under the list of programs. If you click on the icon that has the word "power" in it, then something should pop up that you can work with. In my experience, what came up was this:
 In this case, the meter on the left was set to 59% and the label above the meter, which now shows "Charging," showed Conservation Mode. I clicked on the round icon to the top right of the big meter and out popped a bunch of selections. I clicked on Settings, as you can see, on the top right. The resulting top entry, as shown in the picture, is "Conservation Mode." This was set to "On". So I slid the slider to the left, turning Conservation Mode "Off" and the battery began charging again.
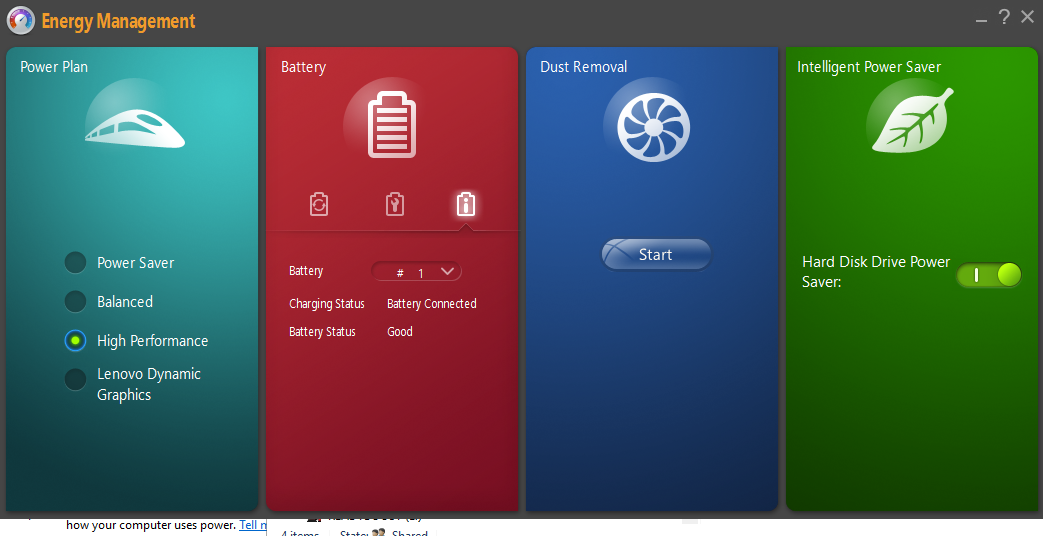
- If there is a button on that tab's display called "Enable Lenovo Energy Management, click it. Either way, the following should be displayed. It is the Lenovo Energy Management interface.
 The key frame in this window is the Battery frame, the red one. There are three symbols below the big battery symbol. From left to right:
 - Battery mode: This is the culprit setting. There are two radio buttons. One is maximum battery life and the other is optimized battery health. If the second option is selected, the computer will not charge the battery past some limit, as described at the beginning. If you want a battery charge to last as long as possible, you want to select the first option, maximum battery life. I know it is confusing.
- The second symbol is important if you changed the selection in the first option from optimized battery health to maximum battery life. The text for that symbol says "Battery gage reset will perform... (blah blah)." You want to click the start button at the bottom of this. Your computer will charge up to 100% and then completely discharge. This will reset the battery limits that might have been set when your computer was in the optimized battery health mode. Now you are done and can close out.
- The third symbol is battery information and is not important here.


No comments:
Post a Comment